Kubernetes 健康检查探针 与 SpirngBoot Actuator 结合
Mr.Lee 2025-05-05 10:42:23 KubernetesActuatorProbe
书接上回, 上次咱们创建一个 own-open-apis 项目, 并接入kubernetes 的环境中. 今天对Kubernetes环境中, 对服务状态检查做出相应优化.
闲言少叙, 开始正文
在Kubernetes中,livenessProbe和readinessProbe是两种健康检查机制,分别用于管理容器的生命周期和流量路由。
# 一. Probe 介绍
# 1. livenessProbe(活跃探针)
- 作用: 检测容器是否正常运行。如果探测失败,kubelet会重启容器(根据重启策略)。
- 适用场景: 当应用进入不可恢复状态(如死锁、内存泄漏导致无响应)时,通过重启恢复服务。
- 失败后果: 容器重启,可能导致Pod IP变化(如果Pod被重新调度)。
- 典型配置:
检查应用核心功能的接口(如
/health),确保应用未卡死。
# 2. readinessProbe(就绪探针)
- 作用: 检测容器是否准备好接收流量。如果探测失败,Pod会从Service的负载均衡池中移除,不再接收新请求。
- 适用场景: 应用需要临时停止服务的场景(如初始化配置、依赖服务未就绪、高负载暂时无法处理请求)。
- 失败后果: 流量被屏蔽,但容器不会重启。适用于需要保留Pod状态或避免重启开销的情况。
- 典型配置:
检查应用初始化完成的信号(如
/ready),或依赖项(如数据库连接)是否正常。
# 3. 探针间的区别
| 特性 | livenessProbe | readinessProbe |
|---|---|---|
| 目标 | 确保应用正常运行,否则重启容器 | 确保应用准备好服务,否则屏蔽流量 |
| 失败处理 | 重启容器 | 从Service端点列表移除Pod |
| 影响范围 | Pod生命周期(可能触发重启) | 网络流量路由 |
| 典型检查内容 | 核心功能是否存活(如心跳检测) | 依赖项是否就绪(如缓存加载完成) |
| 配置优先级建议 | 避免过于敏感,防止误重启 | 确保严格检查,避免流量损失 |
# 二. 实践出真知
完整的代码在这里呦, 欢迎大家 star, fork 哈~
# 1. 引入依赖
.....
<!-- 引入 actuator 相关内容 -->
<dependency>
    <groupId>com.striveonger.common</groupId>
    <artifactId>own-actuator</artifactId>
</dependency>
.....
1
2
3
4
5
6
7
2
3
4
5
6
7
# 2. 启用 Actuator 的 health 功能
......
management:
  endpoints:
    web:
      exposure:
        include: health
  endpoint:
    health:
      probes:
        enabled: true
      group:
        liveness:
          include: active
        readiness:
          include: ready
......
1
2
3
4
5
6
7
8
9
10
11
12
13
14
15
16
2
3
4
5
6
7
8
9
10
11
12
13
14
15
16
# 3. 自定义探针功能
/**
 * @author Mr.Lee
 * @since 2024-11-25 16:11
 */
@Configuration
public class HealthConfig {
    private final Logger log = LoggerFactory.getLogger(HealthConfig.class);

    @Resource
    private MemoryStorageService service;

    @Bean("active")
    public HealthIndicator active() {
        return () -> {
            if (ServiceStatus.Operator.isDown()) {
                log.info("liveness health down");
                return Health.down().build();
            } else {
                log.info("liveness health up");
                return Health.up().build();
            }
        };
    }

    @Bean("ready")
    public HealthIndicator ready() {
        return () -> {
            if (ServiceStatus.UNKNOWN.equals(ServiceStatus.Operator.status())) {
                log.info("readiness health up");
                // 加载热点数据
                service.save("a", Map.of("value", "a", "description", "a"));
                service.save("b", Map.of("value", "b", "description", "b"));
                service.save("c", Map.of("value", "c", "description", "c"));
                ThreadKit.sleep(10, TimeUnit.SECONDS);
                // 进程级记录状态(每个服务的状态独立)
                ServiceStatus.Operator.up();
                return Health.up().build();
            }
            if (ServiceStatus.Operator.isDown()) {
                return Health.down().build();
            } else {
                return Health.up().build();
            }
        };
    }
}
1
2
3
4
5
6
7
8
9
10
11
12
13
14
15
16
17
18
19
20
21
22
23
24
25
26
27
28
29
30
31
32
33
34
35
36
37
38
39
40
41
42
43
44
45
46
2
3
4
5
6
7
8
9
10
11
12
13
14
15
16
17
18
19
20
21
22
23
24
25
26
27
28
29
30
31
32
33
34
35
36
37
38
39
40
41
42
43
44
45
46
这里需要注意, @Bean("$name") 需要和配置文件保持一致
其中ServiceStatus 是在own-actuator中封装的简单工具, 大家感兴趣, 我可以另开一篇讲讲我的own-commons项目(这个项目, 截止到发稿前, 大家能用的版本为0.0.2 同样欢迎大家 star, fork 哈~)
# 4. 添加操作入口
/**
 * @author Mr.Lee
 * @since 2025-04-26 10:18
 */
@RestController
public class OlineController {

    @GetMapping("/api/v1/app/up")
    public Result up() {
        ServiceStatus.Operator.up();
        return Result.success();
    }

    @GetMapping("/api/v1/app/down")
    public Result down() {
        ServiceStatus.Operator.down();
        return Result.success();
    }

    @GetMapping("/api/v1/app/status")
    public Result status() {
        return Result.success().data(Map.of("status", ServiceStatus.Operator.status()));
    }
}
1
2
3
4
5
6
7
8
9
10
11
12
13
14
15
16
17
18
19
20
21
22
23
24
2
3
4
5
6
7
8
9
10
11
12
13
14
15
16
17
18
19
20
21
22
23
24
# 5. 添加helm-chart探针模版
# _probe.tpl
{{/* vim: set filetype=mustache: */}}
{{/* livenessProbe template */}}
{{- define "common.probe.liveness" }}
httpGet:
  path: /actuator/health/liveness
  port: {{ .Values.app.port }}
initialDelaySeconds: 5
failureThreshold: 3
periodSeconds: 15
timeoutSeconds: 10
{{- end -}}

{{/* readinessProbe: template */}}
{{- define "common.probe.readiness" }}
httpGet:
  path: /actuator/health/readiness
  port: {{ .Values.app.port }}
initialDelaySeconds: 45            # 容器启动后等待45秒开始检查
failureThreshold: 3                # 允许的失败次数
periodSeconds:  15                 # 每15秒检查一次
timeoutSeconds:  10                # 请求的超时时间
{{- end -}}
1
2
3
4
5
6
7
8
9
10
11
12
13
14
15
16
17
18
19
20
21
22
23
2
3
4
5
6
7
8
9
10
11
12
13
14
15
16
17
18
19
20
21
22
23
这里的模版中, 绑死了values中的端口号, 当有多个服务时, .app 需要抽象出来, 这里就不弄辣么麻烦了
# 6. 使用探针模版
---
apiVersion: "apps/v1"
kind: "Deployment"
metadata:
  namespace: "{{ .Release.Namespace }}"
  name: "{{ include "own-open-apis.name" . }}-deployment"
spec:
  replicas: {{ .Values.app.replicaCount }}
  selector:
  template:
    metadata:
      namespace: "{{ .Release.Namespace }}"
      name: "{{ include "own-open-apis.name" . }}"
    spec:
      restartPolicy: "Always"
      containers:
        - name: "{{ include "own-open-apis.name" . }}"
          image: "{{ .Values.app.image.repository }}:{{ .Values.app.image.tag }}"
          imagePullPolicy: "{{.Values.app.image.pullPolicy }}"

          livenessProbe:
{{ include "common.probe.liveness" . | indent 12 }}
          readinessProbe:
{{ include "common.probe.readiness" . | indent 12}}
1
2
3
4
5
6
7
8
9
10
11
12
13
14
15
16
17
18
19
20
21
22
23
24
2
3
4
5
6
7
8
9
10
11
12
13
14
15
16
17
18
19
20
21
22
23
24
新增: livenessProbe 和 readinessProbe 两个探针
在编写helm-chart时, 可以用下面的命令查看chart模版渲染后的结果
helm template --debug ci-cd/helm --values ci-cd/helm/values.yaml | vim -
1
# 三. 成果展示
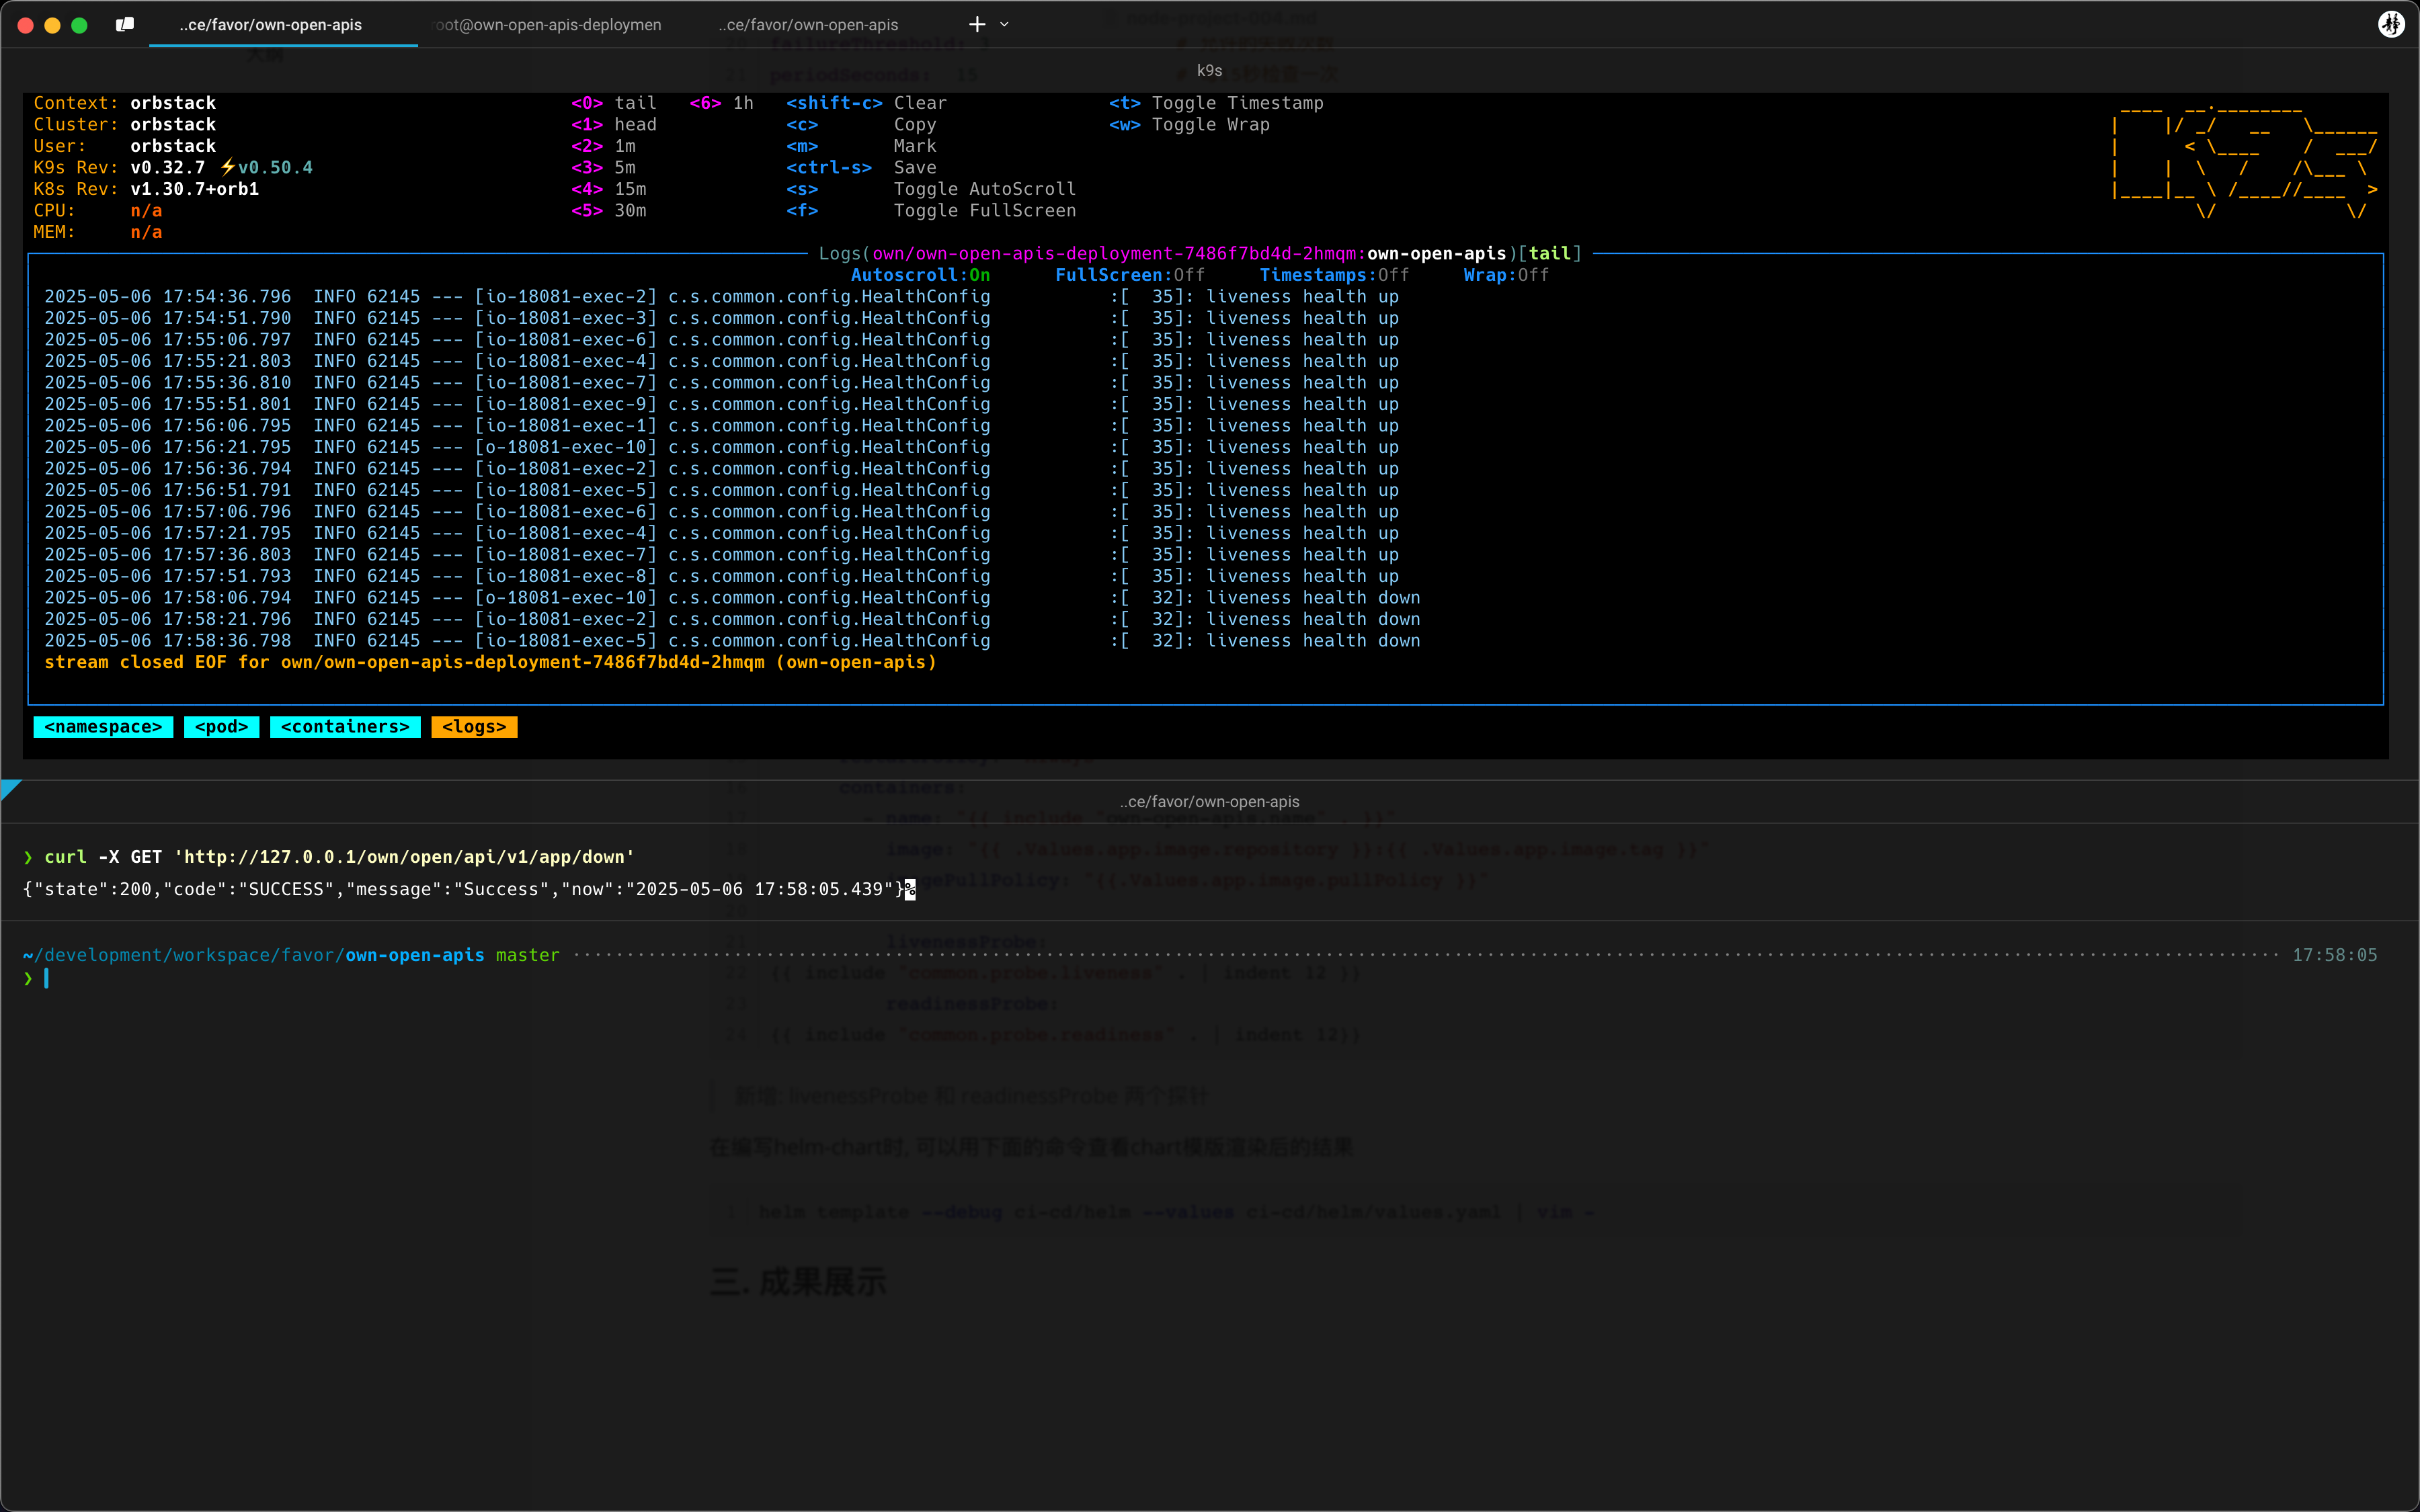
可以从日志中看出:
2025-05-06 17:58:05.439应用状态置为 DOWNlivenessProbe探针在每15s检查一次2025-05-06 17:58:36.798在经过三次检查后, 仍为 DOWN 状态,Pod生命周期结束